# Kubernetes
# Context
Create you a context to work easier
context = given_user + given_cluster + given_namespace
kubectl config set-context bdauphin-training \
--user b.dauphin-k8s-home-cluster \
--cluster k8s-home-cluster \
--namespace dev-scrapper
2
3
4
Print your current context and cluster info
kubectl config get-contexts
kubectl cluster-info
2
Get your token
pip install shyaml

kubectl config view | shyaml get-value users.0.user.auth-provider.config.id-token; echo
2
3
# Deployment
A Deployment provides declarative updates for Pods and ReplicaSets.
You describe a desired state in a Deployment, and the Deployment Controller changes the actual state to the desired state at a controlled rate. You can define Deployments to create new ReplicaSets, or to remove existing Deployments and adopt all their resources with new Deployments.
kubectl create deployment nginx-test-deploy --image nginx -n bdauphin-test
# Full example
apiVersion: apps/v1
kind: Deployment
metadata:
  name: mydeploy
  namespace: myns
  labels:
    app: web-server-statified
spec:
  replicas: 3
  selector:
    matchLabels:
      app: web-server-statified
  template:
    metadata:
      labels:
        app: web-server-statified
        example.com/environment: staging
        example.com/fw.blog.staging: allow
    spec:
      volumes:
        - name: web-server-storage
          persistentVolumeClaim:
            claimName: blog-data
        - name: nginx-config
          configMap:
            name: nginx-config
        - name: nginx-error-pages
          configMap:
            name: nginx-error-pages
        - name: nginx-global-cache
          emptyDir: {}
        - name: nginx-client-cache
          emptyDir: {}
        - name: nginx-logs
          emptyDir: {}
        - name: nginx-pid
          emptyDir: {}
      containers:
      - name: nginx
        image: path.to.registry
        securityContext: &securityContext
          capabilities:
            drop:
            - ALL
            add: []
          allowPrivilegeEscalation: false
          readOnlyRootFilesystem: true
          runAsNonRoot: true
          runAsUser: 1000
          runAsGroup: 1000
        resources:
          requests:
            cpu: 1000m
            memory: 1000Mi
          limits:
            cpu: 1000m
            memory: 1000Mi
        ports:
          - containerPort: 8080
            name: "http-server"
        volumeMounts:
          - name: nginx-config
            mountPath: /etc/nginx/nginx.conf
            subPath: nginx.conf
          - name: nginx-config
            mountPath: /etc/nginx/sites-enabled/example.com
            subPath: example.com
          - name: nginx-error-pages
            mountPath: /var/www/errors_page/400.html
            subPath: 404.html
          - name: nginx-error-pages
            mountPath: /var/www/errors_page/401.html
            subPath: 404.html
          - name: nginx-error-pages
            mountPath: /var/www/errors_page/403.html
            subPath: 404.html
          - name: nginx-error-pages
            mountPath: /var/www/errors_page/404.html
            subPath: 404.html
          - name: nginx-error-pages
            mountPath: /var/www/errors_page/408.html
            subPath: 404.html
          - name: nginx-error-pages
            mountPath: /var/www/errors_page/500.html
            subPath: 500.html
          - name: nginx-error-pages
            mountPath: /var/www/errors_page/502.html
            subPath: 500.html
          - name: nginx-error-pages
            mountPath: /var/www/errors_page/503.html
            subPath: 500.html
          - name: nginx-error-pages
            mountPath: /var/www/errors_page/504.html
            subPath: 500.html
          - name: web-server-storage
            mountPath: /var/www/example.com
          - name: empty-cache
            mountPath: /var/www/cache/search
          - name: nginx-client-cache
            mountPath: /var/cache/nginx
          - name: nginx-logs
            mountPath: /var/log/nginx/
          - name: nginx-pid
            mountPath: /run
      imagePullSecrets:
        - name: mysecretname
2
3
4
5
6
7
8
9
10
11
12
13
14
15
16
17
18
19
20
21
22
23
24
25
26
27
28
29
30
31
32
33
34
35
36
37
38
39
40
41
42
43
44
45
46
47
48
49
50
51
52
53
54
55
56
57
58
59
60
61
62
63
64
65
66
67
68
69
70
71
72
73
74
75
76
77
78
79
80
81
82
83
84
85
86
87
88
89
90
91
92
93
94
95
96
97
98
99
100
101
102
103
104
105
106
107
# StatefulSets
StatefulSet is the workload API object used to manage stateful applications.
Manages the deployment and scaling of a set of Pods, and provides guarantees about the ordering and uniqueness of these Pods.
Like a Deployment, a StatefulSet manages Pods that are based on an identical container spec. Unlike a Deployment, a StatefulSet maintains a sticky identity for each of their Pods. These pods are created from the same spec, but are not interchangeable: each has a persistent identifier that it maintains across any rescheduling.
If you want to use storage volumes to provide persistence for your workload, you can use a StatefulSet as part of the solution. Although individual Pods in a StatefulSet are susceptible to failure, the persistent Pod identifiers make it easier to match existing volumes to the new Pods that replace any that have failed.
# Using StatefulSets
StatefulSets are valuable for applications that require one or more of the following.
- Stable, unique network identifiers.
- Stable, persistent storage.
- Ordered, graceful deployment and scaling.
- Ordered, automated rolling updates. In the above, stable is synonymous with persistence across Pod (re)scheduling. If an application doesn't require any stable identifiers or ordered deployment, deletion, or scaling, you should deploy your application using a workload object that provides a set of stateless replicas.
DeploymentorReplicaSetmay be better suited to your stateless needs.
# Pod
I do not recommend to declare a pod directly. Prefer using deploy
Restart a pod The quickest way is to set the number of replica to zero and then, put back your desired number of rep
kubectl scale deployment nginx --replicas=0
kubectl scale deployment nginx --replicas=5
2
# SecurityContext
# Per pod
apiVersion: v1
kind: Pod
metadata:
  name: security-context-demo
spec:
  securityContext:
    runAsUser: 1000
    runAsGroup: 3000
    fsGroup: 2000
  volumes:
  - name: sec-ctx-vol
    emptyDir: {}
  containers:
  - name: sec-ctx-demo
    image: busybox
    command: [ "sh", "-c", "sleep 1h" ]
    volumeMounts:
    - name: sec-ctx-vol
      mountPath: /data/demo
    securityContext:
      allowPrivilegeEscalation: false
2
3
4
5
6
7
8
9
10
11
12
13
14
15
16
17
18
19
20
21
# Per container
      containers:
      - name: nginx
        image: path.to.registry
        securityContext: &securityContext
          capabilities:
            drop:
            - ALL
            add: []
          allowPrivilegeEscalation: false
          readOnlyRootFilesystem: true
          runAsNonRoot: true
          runAsUser: 1000
          runAsGroup: 1000
2
3
4
5
6
7
8
9
10
11
12
13
# Test communication
# Netcat
BusyBox is a very useful image to test communication, it bundles netcat 😃
kubectl \
-n my-namespace \
run -i \
--rm \
--tty \
busybox \
--image=busybox \
--restart=Never -- \
nc -zvn 10.10.10.10 3306
2
3
4
5
6
7
8
9
Should output something like this
10.10.10.10 (10.10.10.10:3306) open
# Netcat with Calico GNP
Using label in order to get rights to go out of k8s cluster.
kubectl -n wordpress \
run -i --tty busybox --image=busybox:latest \
--labels="app.kubernetes.io/name=wordpress,app.kubernetes.io/instance=wordpress" \
--restart=Never --rm "--" sh -c "bash || sh"
2
3
4
# MySQL
kubectl \
-n my-namespace \
run -i \
--rm \
--tty \
mysql \
--image=mysql \
--restart=Never -- \
mysql -u user1 -p -h 10.10.10.10 -e "SELECT current_user() ;  SELECT user() ; SHOW GRANTS FOR user1@'10.10.%'"
2
3
4
5
6
7
8
9
# Dig (dns)
kubectl \
-n default \
run -i \
--rm \
--tty \
dnsutils \
--image=tutum/dnsutils \
--restart=Never -- \
dig @8.8.8.8 mattrunks.com +short
2
3
4
5
6
7
8
9
# Curl
kubectl \
-n default \
run -i \
--rm \
--tty \
busyboxplus \
--image=radial/busyboxplus:curl \
--restart=Never -- \
curl -v 127.0.0.1/index.html
2
3
4
5
6
7
8
9
# CLI (Run / create / expose)
# Common
Generate POD Manifest YAML file (-o yaml). Don't create it(--dry-run)
kubectl run nginx --image=nginx --dry-run=client -o yaml
Create an NGINX Pod
kubectl run nginx --image=nginx
Generate POD Manifest YAML file (-o yaml). Don't create it(--dry-run)
kubectl run nginx --image=nginx --dry-run=client -o yaml
# Deploy
Create a deployment
kubectl create deployment --image=nginx nginx
Generate Deployment YAML file (-o yaml). Don't create it(--dry-run)
kubectl create deployment --image=nginx nginx --dry-run=client -o yaml
Generate Deployment YAML file (-o yaml). Don't create it(--dry-run) with 4 Replicas (--replicas=4)
kubectl create deployment --image=nginx --replicas=4 nginx --dry-run=client -o yaml > nginx-deployment.yaml
Save it to a file, make necessary changes to the file (for example, adding more replicas) and then create the deployment.
# Service
Create a Service named redis-service of type ClusterIP to expose pod redis on port 6379
kubectl expose pod redis --port=6379 --name redis-service --dry-run=client -o yaml
This will automatically use the pod's labels as selectors
Or
kubectl create service clusterip redis --tcp=6379:6379 --dry-run=client -o yaml
(This will not use the pods labels as selectors, instead it will assume selectors as app=redis. You cannot pass in selectors as an option. So it does not work very well if your pod has a different label set. So generate the file and modify the selectors before creating the service)
Create a Service named nginx of type NodePort to expose pod nginx's port 80 on port 30080 on the nodes:
kubectl expose pod nginx --port=80 --name nginx-service --type=NodePort --dry-run=client -o yaml
(This will automatically use the pod's labels as selectors, but you cannot specify the node port. You have to generate a definition file and then add the node port in manually before creating the service with the pod.)
Or
kubectl create service nodeport nginx --tcp=80:80 --node-port=30080 --dry-run=client -o yaml
(This will not use the pods labels as selectors)
Both the above commands have their own challenges. While one of it cannot accept a selector the other cannot accept a node port. I would recommend going with the kubectl expose command. If you need to specify a node port, generate a definition file using the same command and manually input the nodeport before creating the service.
# Core Concepts
# DNS
Service name.Namespace.Service.domain
dig db-service.dev.svc.cluster.local
In the same namespace, no need to add the
Namespace.Service.domain
# Service
3 types :
- NodePort : Available from
ANY nodeof the cluster. Selected with the port number. - ClusterIp : Internaly accessible only. Useful to gather (load balances) pods for a given usage (backend / frontend / storage). That way, we can easily configured a connection in the code (wereas list of all pods ip)
mysql.connect("db-service.dev.svc.cluster.local")and notmysql.connect("10.244.1.3","10.244.1.4","10.244.1.5") - LoadBalancer IP
# Scheduling
# Taints and tolerations
kubectl describe node node01 | grep Taint
kubectl taint node node01 spray=mortein:NoSchedule
# remove taint
kubectl taint node node01 spray=mortein:NoSchedule-
2
3
4
# Label and NodeAffinity
kubectl label node node01 color=blue

kubectl label node controlplane node-role.kubernetes.io/master
2
3
kubectl create deployment blue --image=nginx --replicas=6 --dry-run=client -o yaml > blue-deployment.yaml
apiVersion: apps/v1
kind: Deployment
metadata:
  labels:
    app: blue
  name: blue
spec:
  replicas: 6
  selector:
    matchLabels:
      app: blue
  template:
    metadata:
      labels:
        app: blue
    spec:
      containers:
      - image: nginx
        name: nginx
      affinity:
        nodeAffinity:
          requiredDuringSchedulingIgnoredDuringExecution:
            nodeSelectorTerms:
            - matchExpressions:
              - key: color
                operator: In
                values:
                - blue
2
3
4
5
6
7
8
9
10
11
12
13
14
15
16
17
18
19
20
21
22
23
24
25
26
27
28
apiVersion: apps/v1
kind: Deployment
metadata:
  name: red
spec:
  replicas: 3
  selector:
    matchLabels:
      app: red
  template:
    metadata:
      labels:
        app: red
    spec:
      containers:
      - image: nginx
        name: nginx
      affinity:
        nodeAffinity:
          requiredDuringSchedulingIgnoredDuringExecution:
            nodeSelectorTerms:
            - matchExpressions:
              - key: node-role.kubernetes.io/master
                operator: Exists
2
3
4
5
6
7
8
9
10
11
12
13
14
15
16
17
18
19
20
21
22
23
24
# Daemonset
Like a replicatset but automatically run on each node even if you remove or add new ones !
DaemonSets are ignored by the Kube-Scheduler !
Docopen in new window
apiVersion: apps/v1
kind: DaemonSet
metadata:
  name: fluentd-elasticsearch
  namespace: kube-system
  labels:
    k8s-app: fluentd-logging
spec:
  selector:
    matchLabels:
      name: fluentd-elasticsearch
  template:
    metadata:
      labels:
        name: fluentd-elasticsearch
    spec:
      tolerations:
      # this toleration is to have the daemonset runnable on master nodes
      # remove it if your masters can't run pods
      - key: node-role.kubernetes.io/master
        effect: NoSchedule
      containers:
      - name: fluentd-elasticsearch
        image: quay.io/fluentd_elasticsearch/fluentd:v2.5.2
        resources:
          limits:
            memory: 200Mi
          requests:
            cpu: 100m
            memory: 200Mi
        volumeMounts:
        - name: varlog
          mountPath: /var/log
        - name: varlibdockercontainers
          mountPath: /var/lib/docker/containers
          readOnly: true
      terminationGracePeriodSeconds: 30
      volumes:
      - name: varlog
        hostPath:
          path: /var/log
      - name: varlibdockercontainers
        hostPath:
          path: /var/lib/docker/containers
2
3
4
5
6
7
8
9
10
11
12
13
14
15
16
17
18
19
20
21
22
23
24
25
26
27
28
29
30
31
32
33
34
35
36
37
38
39
40
41
42
43
44
# Static pods
Contrary to all other pods, the static pods are not managed by the kube-api server but by the kubelet of the node itself !
It's useful for deploy the control-plane components !
Static pods are ignored by the Kube-Scheduler !
# Application Lifecycle Management
# Rolling Updates
kubectl rollout status deployment/myapp-deployment

kubectl rollout history deployment/myapp-deployment
2
3
# Command & Args
apiVersion: v1
kind: Pod
metadata:
  name: ubuntu-sleeper-2
spec:
  containers:
  - name: ubuntu
    image: ubuntu
    command: ["sleep"]
    args: ["5000"]
2
3
4
5
6
7
8
9
10
# Only args
kubectl run webapp-green --image=kodekloud/webapp-color -- --color=green
# ConfigMap
ConfigMaps allow you to decouple configuration artifacts from image content to keep containerized applications portable. This page provides a series of usage examples demonstrating how to create ConfigMaps and configure Pods using data stored in ConfigMaps.
Most of the time it's a list of key-value pairs
It can be defined as environment variables
and/or Be mounted into the pod at a specified path
# Creation
kubectl get cm db-config -o yaml | tee configmap.yaml
apiVersion: v1
data:
  APP_COLOR: "darkblue"
kind: ConfigMap
metadata:
  name: webapp-config-map
  namespace: default
2
3
4
5
6
7
# Load inside pods
...
  - envFrom:
    - configMapRef:
          name: webapp-config-map
...
2
3
4
5
apiVersion: v1
kind: Pod
metadata:
  labels:
    name: webapp-color
  name: webapp-color
  namespace: default
spec:
  containers:
  - envFrom:
    - configMapRef:
          name: webapp-config-map
    image: kodekloud/webapp-color
    name: webapp-color
2
3
4
5
6
7
8
9
10
11
12
13
14
# Secrets
Kubernetes secret objects let you store and manage sensitive information, such as passwords, OAuth tokens, and ssh keys. Putting this information in a secret is safer and more flexible than putting it verbatim in a Pod definition or in a container image . See Secrets design document for more information.
Same a ConfigMap, but intended to store sensitive data.Encode to base64 before fill the data.
echo -n 'password123' | base64
cGFzc3dvcmQxMjM=
2
apiVersion: v1
kind: Secret
metadata:
  name: db-secret
data:
  DB_Host: c3FsMDE=
  DB_User: cm9vdA==
  DB_Password: cGFzc3dvcmQxMjM=
2
3
4
5
6
7
8
Pods definition with secret loaded
apiVersion: v1
kind: Pod
metadata:
  labels:
    name: webapp-pod
  name: webapp-pod
  namespace: default
spec:
  containers:
  - image: kodekloud/simple-webapp-mysql
    name: webapp
    envFrom:
    - secretRef:
        name: db-secret
    terminationMessagePath: /dev/termination-log
    terminationMessagePolicy: File
    volumeMounts:
    - mountPath: /var/run/secrets/kubernetes.io/serviceaccount
      name: default-token-wv496
      readOnly: true
  volumes:
  - name: default-token-wv496
    secret:
      defaultMode: 420
      secretName: default-token-wv496
2
3
4
5
6
7
8
9
10
11
12
13
14
15
16
17
18
19
20
21
22
23
24
25
# Retrieve secret
kubectl get secrets wordpress-mariadb \
-o jsonpath="{.data['mariadb-root-password']}" | base64 -d
2
# Multi-container pods
Multiple containers can be defined in the same pod.
All containers share :
Network space. They can reach each other by usinglocalhost- They access the same
storage volume - No need to setup any services between them to communicate.
# Sidecar
A sidecar is a classic container running in the same pod as the process (application) it wants to follow the lifecycle.
In this example a filebeat container is reading and sending to elastic search the app container (kodekloud/event-simulator image).
This is done by mounting the same volume (log-volume). Example :
apiVersion: v1
kind: Pod
metadata:
  labels:
    name: app
  name: app
  namespace: elastic-stack
spec:
  containers:
  - image: kodekloud/event-simulator
    imagePullPolicy: Always
    name: app
    volumeMounts:
    - mountPath: /log
      name: log-volume
  - name: sidecar
    image: kodekloud/filebeat-configured
    volumeMounts:
    - mountPath: /var/log/event-simulator/
      name: log-volume
2
3
4
5
6
7
8
9
10
11
12
13
14
15
16
17
18
19
20
# InitContainers
When a POD is first created the initContainer is run, and the process in the initContainer must run to a completion before the real container hosting the application starts.
You can configure multiple such initContainers as well, like how we did for multi-pod containers. In that case each init container is run one at a time in sequential order.
If any of the initContainers fail to complete, Kubernetes restarts the Pod repeatedly until the Init Container succeeds.
apiVersion: v1
kind: Pod
metadata:
  name: myapp-pod
  labels:
    app: myapp
spec:
  containers:
  - name: myapp-container
    image: busybox:1.28
    command: ['sh', '-c', 'echo The app is running! && sleep 3600']
  initContainers:
  - name: init-myservice
    image: busybox:1.28
    command: ['sh', '-c', 'until nslookup myservice; do echo waiting for myservice; sleep 2; done;']
  - name: init-mydb
    image: busybox:1.28
    command: ['sh', '-c', 'until nslookup mydb; do echo waiting for mydb; sleep 2; done;']
2
3
4
5
6
7
8
9
10
11
12
13
14
15
16
17
18
# Logs
kubectl logs app -n elastic-stack
# Cluster Maintenance
# Os upgrade
See on which node pods are running
kubectl get pods -o wide
NAME                    READY   STATUS    RESTARTS   AGE     IP           NODE     NOMINATED NODE   READINESS GATES
blue-746c87566d-2d6v4   1/1     Running   0          2m41s   10.244.1.4   node03   <none>           <none>
blue-746c87566d-mz9bb   1/1     Running   0          4m39s   10.244.3.3   node02   <none>           <none>
blue-746c87566d-rwr5f   1/1     Running   0          4m39s   10.244.1.2   node03   <none>           <none>
red-75f847bf79-mb7j5    1/1     Running   0          2m41s   10.244.1.3   node03   <none>           <none>
red-75f847bf79-ssj4n    1/1     Running   0          4m39s   10.244.3.2   node02   <none>           <none>
2
3
4
5
6
7
When a pod is directly defined. And not managed by any ReplicaSet, Job, DaemonSet, StatefulSet, it will be removed forever. That's why uou have to force it for drain the node.
error: cannot delete Pods not managed by ReplicationController, ReplicaSet, Job, DaemonSet or StatefulSet (use --force to override): default/hr-app
kubectl drain node02 --ignore-daemonsets
kubectl drain node02 --ignore-daemonsets --force
2
Mark node03 as unschedulable but do not remove any apps currently running on it .
kubectl cordon node03
# Cluster upgrade process (with kubeadm)
See how workload can be handled
kubectl describe nodes node01 | grep -i taints
kubectl describe nodes controlplane | grep -i taints
2
Get the number of application running on the cluster. See the deployments
kubectl get deployments.apps
Check where pods are running
kubectl get pods -o wide
What is the latest stable version available for upgrade ?
Warning : Version available for upgrade depends on kubeadm version.
kubeadm upgrade plan
# For a given node
Warning : Version available for upgrade depends on kubeadm version.
So, think about upgrade kubeadm before running upgrade process !
Drain the node
kubectl drain controlplane --ignore-daemonsets
Upgrade kubeadm
apt install -y kubeadm=1.19.0-00
Upgrade controlplane components (api-server, Controller-manager, Scheduler, Kube-proxy) (4/5)
kubeadm upgrade apply v1.19.0
Upgrade the remaining controlplane components kubelet (5/5)
apt install -y kubelet=1.19.0-00
- Mark the master/controlplane node as "Schedulable" again
kubectl uncordon controlplane
# Backup and restore methods
Resource configurationmanifest (declarative resources)Etcd(kube-api backend) containing (declarative + imperative resources)Persistent volumes
# Snapshot ETCD
Connect to the etcd server, so we need to authenticate via tls.
export ETCDCTL_API=3
etcdctl \
snapshot save /opt/snapshot-pre-boot.db \
--endpoints=https://127.0.0.1:2379 \
--cacert="/etc/kubernetes/pki/etcd/ca.crt" \
--cert="/etc/kubernetes/pki/etcd/server.crt" \
--key="/etc/kubernetes/pki/etcd/server.key"
2
3
4
5
6
7
Get status of our snapshot.
This command doesn't make any connection to etcd cluster. Only file management on filesystem !
export ETCDCTL_API=3
etcdctl \
snapshot status /opt/snapshot-pre-boot.db
2
3
# Restore ETCD
This command doesn't make any connection to etcd cluster. Only file management on filesystem !
export ETCDCTL_API=3
etcdctl \
snapshot restore /opt/snapshot-pre-boot.db \
--data-dir /var/lib/etcd-from-backup
2
3
4
And then edit the etcd static pod config in order to make it load data dir from the new one you just created ! 😃
vim /etc/kubernetes/manifests/etcd.yaml
...
  volumes:
  - hostPath:
      path: /var/lib/etcd
      type:: DirectoryOrCreate
    name: etcd-data
...
2
3
4
5
6
7
Become
...
  volumes:
  - hostPath:
      path: /var/lib/etcd-from-backup
      type:: DirectoryOrCreate
    name: etcd-data
...
2
3
4
5
6
7
# Security
Accounts
- Humans
- Admins
- Developpers
- End User (managed directly by applications running inside k8s)
- Bots
- Service Accounts
# TLS - Certificate creation
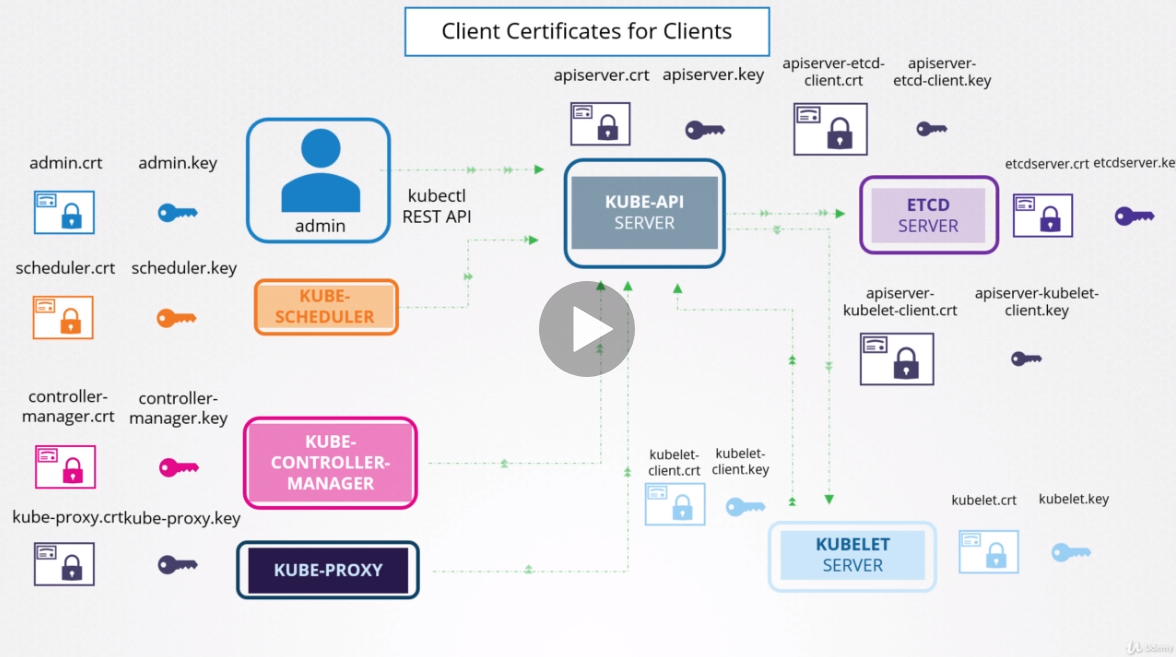
# Certificate Authority (CA)
- Generate key (ca.key)
openssl genrsa -out ca.key 4096
- Certificate Signing Request (ca.csr)
openssl req -new -key ca.key -subj "/CN=KUBERNETES-CA" -out ca.csr
- Sign Certificate (ca.crt)
openssl x509 -req -in ca.csr -signkey ca.key -out ca.crt
# Users certificates (+ key)
Example for admin user. Repeat this for all your users (admin, scheduler, controller-manager, kube-proxy, kubelet, kube-apiserver, etc)
- Generate key (ca.key)
openssl genrsa -out admin.key 4096
- Certificate Signing Request (ca.csr)
openssl req -new -key admin.key -subj "/CN=kube-admin" -out admin.csr
- Sign Certificate (ca.crt)
openssl x509 -req -in admin.csr -CA ca.crt -CAkey ca.key -out admin.crt
# CronJob
Cronjob define jobs that run pods on regular basis to execute specific task, like backup, copy etc.
kubectl -n your_ns \
create job --from=cronjob/wordpress-copy statification-manual-$(date +%d-%m-%Y-%H-%M-%S)
2
# Volumes
# Persistent Volume
And their status should be Bound and not Released because those (pv) names are get from the PVCs directly.
for pv in $(kubectl -n int-comcenter get pvc -o json | jq -r '.items[].spec.volumeName'); do
  kubectl get pv $pv
done
2
3
# RBAC
Role-based access control (RBAC) is a method of regulating access to computer or network resources based on the roles of individual users within an enterprise.
complete docopen in new window
- Role : defines rules
- Role Binding
# Role
Defines
- Rules
- API Groups
default : core API group - resources
ex : pod - verbs
allowed methods
- API Groups
A Role can only be used to grant access to resources within a single namespace. Here’s an example Role in the “default” namespace that can be used to grant read access to pods:
apiVersion: rbac.authorization.k8s.io/v1
kind: Role
metadata:
  namespace: default
  name: pod-reader
rules:
- apiGroups: [""]  #### "" indicates the core API group
  resources: ["pods"]
  verbs: ["get", "watch", "list"]
2
3
4
5
6
7
8
9
# RoleBinding
Defines
- Subjects
- Kind
ex : user - name
ex : jane - apiGroup
- Kind
- Role References
- Kind
ex : Role - name
ex : pod-reader - apiGroup
- Kind
A role binding grants the permissions defined in a role to a user or set of users. It holds a list of subjects (users, groups, or service accounts), and a reference to the role being granted. Permissions can be granted within a namespace with a RoleBinding, or cluster-wide with a ClusterRoleBinding.
Example
This role binding allows "jane" to read pods in the "default" namespace.
apiVersion: rbac.authorization.k8s.io/v1
kind: RoleBinding
metadata:
  name: read-pods
  namespace: default
subjects:
- kind: User
  name: jane #### Name is case sensitive
  apiGroup: rbac.authorization.k8s.io
roleRef:
  kind: Role #### this must be Role or ClusterRole
  name: pod-reader #### this must match the name of the Role or ClusterRole you wish to bind to
  apiGroup: rbac.authorization.k8s.io
2
3
4
5
6
7
8
9
10
11
12
13
# Ingress
An API object that manages external access to the services in a cluster, typically HTTP.
Ingress can provide load balancing, SSL termination and name-based virtual hosting.
What is ingress ?
Ingress exposes HTTP and HTTPS routes from outside the cluster to services within the cluster. Traffic routing is controlled by rules defined on the Ingress resource.
  internet
      |
 [ Ingress ]
 --|-----|--
 [ Services ]
2
3
4
5
An Ingress can be configured to give Services externally-reachable URLs, load balance traffic, terminate SSL / TLS, and offer name based virtual hosting. An Ingress controller is responsible for fulfilling the Ingress, usually with a load balancer, though it may also configure your edge router or additional frontends to help handle the traffic.
An Ingress does not expose arbitrary ports or protocols. Exposing services other than HTTP and HTTPS to the internet typically uses a service of type Service.Type=NodePort or Service.Type=LoadBalancer.
# Node
List all pods and its nodes
kubectl get pod -o=custom-columns=NODE:.spec.nodeName,NAME:.metadata.name,NAMESPACE:.metadata.namespace --all-namespaces

kubectl get pod -o=custom-columns=NODE:.spec.nodeName,NAME:.metadata.name,NAMESPACE:.metadata.namespace --all-namespaces | grep mypod

kubectl get pod -o=custom-columns=NODE:.spec.nodeName,NAME:.metadata.name,NAMESPACE:.metadata.namespace --all-namespaces | grep node01
2
3
4
5
# Networking
Here is how you can get internal IP addresses of cluster nodes:
kubectl get nodes -o json | \
jq -r '.items[].status.addresses[]? | select (.type == "InternalIP") | .address' | \
paste -sd "\n" -
2
3
You can print all services and their respective nodePorts:
kubectl get --all-namespaces svc -o json | \
  jq -r '.items[] | [.metadata.name,([.spec.ports[].nodePort | tostring ] | join("|"))]| @tsv'
2
Get Pods CIDR
kubectl get nodes -o jsonpath='{.items[*].spec.podCIDR}' | tr " " "\n"
# Config extraction
Why use config file instead of CLI ?
- Cli is good for begin, help to understand. But heavy to use everyday
- Often complexe definition, easier to use a config file
- Can version (git)
kubectl get deploy nginx                              -o yaml | tee nginx-deploy.yaml
kubectl get serviceaccounts/default -n bdauphin-test  -o yaml | tee serviceaccounts.yaml
kubectl get pods/nginx-65d61548fd-mfhpr               -o yaml | tee pod.yaml

kubectl -n rook-ceph exec -ti pods/rook-ceph-operator-574856664-7kvt6  -- cat /var/lib/rook/rook-ceph/rook-ceph.config > rook-ceph.config
kubectl -n rook-ceph create cm rook-ceph-csi-config --from-file=rook-ceph.config

kubectl get secret -n monitoring auth-config -o jsonpath='{.data.admin-password}' | base64 -d
2
3
4
5
6
7
8
Official cheat sheet https://kubernetes.io/docs/reference/kubectl/cheatsheet/
# Common cmd
first, get all into your current namespace. Or specify another one
watch -n 1 kubectl get all -o wide
watch -n 1 kubectl get all -o wide -n default
2
# Helm
Client : helm
Helm uses go template render engine.
# Generate your first chart
helm create $mychart
helm create elasticsearch
2
Helm will create a new directory in your project called mychart with
elasticsearch
├── charts
├── Chart.yaml
├── templates
│   ├── deployment.yaml
│   ├── _helpers.tpl
│   ├── ingress.yaml
│   ├── NOTES.txt
│   ├── service.yaml
│   └── tests
│       └── test-connection.yaml
└── values.yaml
2
3
4
5
6
7
8
9
10
11
12
# Templates
The most important piece of the puzzle is the templates/ directory.
It’s worth noting however, that the directory is named templates, and Helm runs each file in this directory through a Go templateopen in new window rendering engine.
helm install --dry-run --debug ./elasticsearch
helm install ./elasticsearch
2
# Values
The template in service.yaml makes use of the Helm-specific objects .Chart and .Values.
| Values | Default | override | meaning |
|---|---|---|---|
.Chart | provides metadata about the chart to your definitions such as the name, or version | ||
.Values | values.yaml | --set key=value, --values $file | key element of Helm charts, used to expose configuration that can be set at the time of deployment |
For more advanced configuration, a user can specify a YAML file containing overrides with the --values option.
helm install --dry-run --debug ./mychart --set service.internalPort=8080
helm install --dry-run --debug ./mychart --values myCustomeValues.yaml
2
### Plugin
# Diff
helm plugin install https://github.com/databus23/helm-diff

helm diff upgrade -n default -f path/to/konfigurator.yaml konfigurator .
2
3
# Worth knowing cmd
As you develop your chart, it’s a good idea to run it through the linter to ensure you’re following best practices and that your templates are well-formed. Run the helm lint command to see the linter in action:
helm lint ./mychart
==> Linting ./mychart
[INFO] Chart.yaml: icon is recommended

1 chart(s) linted, no failures
2
3
4
5
# Operator
# Tool
# Lens
https://github.com/lensapp/lens
./Lens-3.5.0.AppImage --no-sandbox
# Experience
Very interesting experience about what gitlab.com learned after a year of GitLab.com on Kubernetes.
https://about.gitlab.com/blog/2020/09/16/year-of-kubernetes/
# Nginx Ingress Controller annotations
https://kubernetes.github.io/ingress-nginx/user-guide/nginx-configuration/annotations/
# Debug
# PersistentVolumeClaim
Create a temporary pod with your PVC mounted inside !
kind: Pod
apiVersion: v1
metadata:
  name: volume-debugger
spec:
  volumes:
    - name: volume-to-debug
      persistentVolumeClaim:
       claimName: my-pvc
  containers:
    - name: debugger
      image: busybox
      command: ['sleep', '3600']
      volumeMounts:
        - mountPath: "/debug/my-pvc-fs"
          name: volume-to-debug
2
3
4
5
6
7
8
9
10
11
12
13
14
15
16