# Databases
# MySQL
# Create, User, Password
CREATE USER 'newuser'@'localhost' IDENTIFIED BY 'password';
CREATE USER 'api_153'@'10.10.%.%' IDENTIFIED BY 'password';
SELECT user, host FROM mysql.user;
SHOW CREATE USER api@'%';
2
3
4
# Remove user
DROP USER 'jeffrey'@'localhost';
# GRANTS (rights)
GRANT SELECT, INSERT, UPDATE, DELETE ON `github`.* TO 'api_153'@'10.10.%.%';
GRANT ALL PRIVILEGES ON `github`.`user` TO 'api_153'@'10.10.%.%';

-- Apply GRANT
FLUSH PRIVILEGES;
2
3
4
5
# Update rights
SELECT password FROM mysql.user WHERE User='user1';

UPDATE mysql.user SET Host='10.10.%' WHERE User='user1' AND Password='*...';
UPDATE mysql.db SET Host='10.10.%' WHERE host='10.20.20.%' AND user='user1';
2
3
4
# Charset
Check the default character set and collation
SELECT * FROM INFORMATION_SCHEMA.SCHEMATA;
latin1_swedish_ci => utf8_general_ci ?
# Default Character
Alter TABLE table1 CONVERT TO CHARACTER SET utf8;

ALTER DATABASE mydb charset=utf8;
2
3
Verify default charset
show create table table1;

show create database mydb;
2
3
# Update password
# Update ROOT password
For mysql 5.7. Works for percona 5.7 etc.
When you already know the current root password 😃
ALTER USER 'root'@'localhost' IDENTIFIED WITH mysql_native_password BY 'password';
Original postopen in new window
# Update no-ROOT password
For mysql 5.7. Works for percona 5.7 etc.
When you already know the current root password 😃
ALTER USER 'user1'@'10.10.10.10' IDENTIFIED BY 'password';
For MariaDB
Test hash for a given entry
SELECT PASSWORD('newpass');

SET PASSWORD FOR 'bob'@'%.loc.gov' = PASSWORD('newpass');
2
3
# Show grants (rights)
SHOW GRANTS FOR user@git.baptiste-dauphin.com;
# REVOKE (rights)
REVOKE INSERT ON *.* FROM 'jeffrey'@'localhost';
REVOKE ALL PRIVILEGES ON `github`.* FROM 'jeffrey'@'localhost';
2
# Table information
show table status like 'mytablename'\G
*************************** 1. row ***************************
           Name: mytablename
         Engine: MyISAM
        Version: 10
     Row_format: Dynamic
           Rows: 2444
 Avg_row_length: 7536
    Data_length: 564614700
Max_data_length: 281474976710655
   Index_length: 7218176
      Data_free: 546194608
 Auto_increment: 1187455
    Create_time: 2008-03-19 10:33:13
    Update_time: 2008-09-02 22:18:15
     Check_time: 2008-08-27 23:07:48
      Collation: latin1_swedish_ci
       Checksum: NULL
 Create_options: pack_keys=0
        Comment:
2
3
4
5
6
7
8
9
10
11
12
13
14
15
16
17
18
19
# Worth known command
From shell (outside of a MySQL prompt)
mysql -u root -p -e 'SHOW VARIABLES WHERE Variable_Name LIKE "%dir";'
Show users and remote client IP or subnet etc
SELECT user, host FROM mysql.user;
select user, host FROM mysql.user WHERE user = 'b.dauphin';
2
Show current queries
SHOW FULL PROCESSLIST;
# Variables, status
% is a wildcard char like *
SHOW VARIABLES WHERE Variable_Name LIKE "%log%";

SHOW VARIABLES WHERE Variable_Name LIKE "wsrep%";

SHOW STATUS like 'Bytes_received';
SHOW STATUS like 'Bytes_sent';
2
3
4
5
6
# Log
# Binary log
The binary log is a valuable resource for point in time recovery and for taking
incremental backup.
In other case, if no binlog is found. Or, log found but not old enough. Then, afull backupis made
The file mysql-bin.[index] keeps a list of all binary logs mysqld has generated and auto-rotated. The mechanisms for cleaning out the binlogs in conjunction with mysql-bin.[index] are:
PURGE BINARY LOGS TO 'binlogname';
PURGE BINARY LOGS BEFORE 'datetimestamp';

PURGE BINARY LOGS BEFORE '2020-10-31 00:00:00';
2
3
4
# Changing expire logs days without restarting the server
mysql> show variables like 'expire_logs_days';
+------------------+-------+
| Variable_name    | Value |
+------------------+-------+
| expire_logs_days | 0     |
+------------------+-------+
2
3
4
5
6
SET GLOBAL expire_logs_days = 7;
mysql> show variables like 'expire_logs_days';
+------------------+-------+
| Variable_name    | Value |
+------------------+-------+
| expire_logs_days | 7     |
+------------------+-------+
2
3
4
5
6
official docopen in new window
# Analyze binary logs
mysqlbinlog -d github \
--base64-output=DECODE-ROWS \
--start-datetime="2005-12-25 11:25:56" \
pa6.k8s.node.01-bin.000483
2
3
4
# InnoDB buffer
# Pool size tuning
innodb_buffer_pool_sizeopen in new window : Default value : 128 Mo
/etc/mysql/percona-server.conf.d/mysqld.cnf
[mysqld]
innodb-buffer-pool-size = 3G
2
SHOW VARIABLES WHERE Variable_Name LIKE "innodb_buffer_pool_size";
+-------------------------+------------+
| Variable_name           | Value      |
+-------------------------+------------+
| innodb_buffer_pool_size | 3221225472 |
+-------------------------+------------+
2
3
4
5
InnoDB Buffer Pool Size Calculatoropen in new window
# Pool pages
Innodb_buffer_pool_pages_total x Innodb_page_size = innodb_buffer_pool_size
- Innodb_buffer_pool_pages_totalopen in new window
- innodb_page_sizeopen in new window : Default value : 16 Ko
- innodb_buffer_pool_sizeopen in new window : Default value : 128 Mo
SHOW GLOBAL STATUS LIKE 'Innodb_buffer_pool_pages_%';
+-----------------------------------------+--------+
| Variable_name                           | Value  |
+-----------------------------------------+--------+
| Innodb_buffer_pool_pages_data           | 438    |
| Innodb_buffer_pool_pages_dirty          | 4      |
| Innodb_buffer_pool_pages_flushed        | 720    |
| Innodb_buffer_pool_pages_free           | 196146 |
| Innodb_buffer_pool_pages_LRU_flushed    | 0      |
| Innodb_buffer_pool_pages_made_not_young | 0      |
| Innodb_buffer_pool_pages_made_young     | 0      |
| Innodb_buffer_pool_pages_misc           | 0      |
| Innodb_buffer_pool_pages_old            | 0      |
| Innodb_buffer_pool_pages_total          | 196584 |
+-----------------------------------------+--------+
2
3
4
5
6
7
8
9
10
11
12
13
14
InnoDB variables explainedopen in new window
# Resizing Buffer Pool without downtime
byte converteropen in new window
Resize on the runtime (mysql must be running)
Example for 5 Go.
SET GLOBAL innodb_buffer_pool_size = 5368709120;

Query OK, 0 rows affected (0.01 sec)
2
3
Monitor the state of the resizing process
SHOW GLOBAL STATUS LIKE 'Innodb_buffer_pool_resize_status';

+----------------------------------+----------------------------------------------------+
| Variable_name                    | Value                                              |
+----------------------------------+----------------------------------------------------+
| Innodb_buffer_pool_resize_status | Completed resizing buffer pool at 210421 13:59:54. |
+----------------------------------+----------------------------------------------------+
2
3
4
5
6
7
Ensure the size is well changed.
SHOW VARIABLES WHERE Variable_Name LIKE "innodb_buffer_pool_size";

+-------------------------+------------+
| Variable_name           | Value      |
+-------------------------+------------+
| innodb_buffer_pool_size | 5368709120 |
+-------------------------+------------+
2
3
4
5
6
7
Make your change persistent for further restart.
vim /etc/mysql/percona-server.conf.d/mysqld.cnf
innodb-buffer-pool-size = 5G
# Size info
# Table size
SELECT table_name AS `Table`, round(((data_length + index_length) / 1024 / 1024), 2) `Size in MB` FROM information_schema.TABLES WHERE table_schema = "github_db1" AND table_name = "table1";
# All tables of all databases with size
SELECT
     table_schema as `Database`,
     table_name AS `Table`,
     round(((data_length + index_length) / 1024 / 1024), 2) `Size in MB`,
     round(((data_length + index_length) / 1024 / 1024 / 1024), 2) `Size in GB`
FROM information_schema.TABLES
ORDER BY table_schema, data_length + index_length DESC;
2
3
4
5
6
7
# All Databases size
SELECT table_schema "Database", ROUND(SUM(data_length + index_length) / 1024 / 1024, 1) "DB Size in MB" FROM information_schema.tables GROUP BY table_schema;
# INSERT (feed)
put the .sql.gz file into STDIN of gunzip and then, send to mysql
gunzip < [compressed_filename.sql.gz] | mysql -u [user] -p[password] [databasename]
If you encouter errors like foreign key
gunzip < heros_db.sql.gz | mysql --init-command="SET SESSION FOREIGN_KEY_CHECKS=0;" -u root -p heros
Full explanationopen in new window
# All in one usage ❤️
mysql -u baptiste -p -h database.baptiste-dauphin.com -e "SELECT table_schema 'DATABASE_1', ROUND(SUM(data_length + index_length) / 1024 / 1024, 1) 'DB Size in MB' FROM information_schema.tables GROUP BY table_schema;"
# Tool
# mysql_upgrade
Run after a mysql upgrade. Update system tables like performance_schema
mysql_upgrade -u root -p
# Check config
Test configuration before restart. Will output if some error exist
mysqld --help
# Check definition precedance
Simulate the running config If you would have been started mysql
mysqld --print-defaults
# MySQLdump (structure + data)
| cmd | meaning |
|---|---|
--all-databases | Dump all tables in all databases, WITHOUT 'INFORMATION_SCHEMA' and 'performace_schema' |
--add-drop-database | Add DROP DATABASE statement before each CREATE DATABASE statement |
--skip-add-locks | Do not add locks |
--ignore-table | ignore a table |
with mysqldump
mysqldump \
-h 10.10.10.10 \
-u root \
-p \
db1 table1 table2 table3 \
--all-databases \
--add-drop-database \
--ignore-table=DB.table_name \
--skip-add-locks \
--skip-lock-tables \
--single-transaction \
> /home/b.dauphin/mysqldump/db1_$(date +%d-%m-%Y-%H:%M:%S).sql
2
3
4
5
6
7
8
9
10
11
12
Compress the dump
cat dump.sql | gzip > dump.sql.gz
# Structure only
To export to file (structure only)
mysqldump \
-u [user] \
-p[pass] \
--no-data \
mydb \
> mydb.sql
2
3
4
5
6
Exemple
mysqldump \
-u root \
-p \
--single-transaction \
--skip-add-locks \
--skip-lock-tables \
--skip-set-charset \
--no-data \
mydb \
> db1_STRUCTURE.sql
2
3
4
5
6
7
8
9
10
# Data only
To export to file (data only)
mysqldump \
-u [user] \
-p[pass] \
--no-create-info \
mydb \
> mydb.sql
2
3
4
5
6
Exemple
mysqldump \
-u root \
-p \
--single-transaction \
--skip-add-locks \
--skip-lock-tables \
--skip-set-charset \
--no-create-info \
mydb \
| gzip > mydb_DATA.sql.gz
2
3
4
5
6
7
8
9
10
cat db1_STRUCTURE.sql         | mysql -u root -p db1
cat db1_DATA.sql.gz  | gunzip | mysql -u root -p db1
2
To import to database
mysql -u [user] -p[pass] mydb < mydb.sql
or
gunzip < heros_db.sql.gz | mysql --init-command="SET SESSION FOREIGN_KEY_CHECKS=0;" -u root -p heros
2
3
# Percona Toolkit
Works only with Percona or Percona xtraDB Cluster (but not with mysql/mariadb)
apt install percona-toolkit
# Show GRANTS for all users
Canonicalize and print MySQL grants so you can effectively replicate, compare and version-control them.pt-show-grants
It will find user presence for all sources. So, no need to specify source address 😉
pt-show-grants \
--only hndfncvkle \
--user root \
--ask-pass
2
3
4
pt-show-grants \
--only aus4_dev \
--user root \
--ask-pass

-- Grants for 'aus4_dev'@'10.0.0.1'

GRANT USAGE ON *.* TO 'aus4_dev'@'10.0.0.1' IDENTIFIED BY PASSWORD '*1234567890ABCDEF1234567890ABCDEF12345678';
GRANT ALL PRIVILEGES ON `aus4_dev`.* TO 'aus4_dev'@'10.0.0.2';

-- Grants for 'aus4_dev'@'10.0.0.2'

GRANT USAGE ON *.* TO 'aus4_dev'@'10.0.0.2' IDENTIFIED BY PASSWORD '*1234567890ABCDEF1234567890ABCDEF12345678';
GRANT ALL PRIVILEGES ON `aus4_dev`.* TO 'aus4_dev'@'10.0.0.2';
2
3
4
5
6
7
8
9
10
11
12
13
14
pt-show-grants --separate --revoke | diff othergrants.sql -
# ALTER tables without locking them.
pt-online-schema-change emulates the way that MySQL alters tables internally, but it works on a copy of the table you wish to alter. This means that the original table is not locked, and clients may continue to read and change data in it.
pt-online-schema-change works by creating an empty copy of the table to alter, modifying it as desired, and then copying rows from the original table into the new table. When the copy is complete, it moves away the original table and replaces it with the new one. By default, it also drops the original table.
pt-online-schema-change --alter "ADD COLUMN c1 INT" D=sakila,t=actor

pt-online-schema-change --alter "ENGINE=InnoDB" D=sakila,t=actor
2
3
Example :
ALTER TABLE `user` CHANGE `c3` `c3` MEDIUMTEXT NOT NULL;
Will become
pt-online-schema-change \
--alter "CHANGE c3 c3 MEDIUMTEXT NOT NULL" \
D=DB,t=user,h=localhost \
--alter-foreign-keys-method="auto" \
--user root \
--ask-pass \
--dry-run
2
3
4
5
6
7
Exemple 2 multiple alterations
alter table `users`
add `person_name` varchar(255) null,
add `title` varchar(255) null,
add `image` longtext null,
add `cta` varchar(255) null,
add `os` varchar(255) null;
2
3
4
5
6
Become
pt-online-schema-change \
--alter "ADD COLUMN person_name varchar(255) NULL, ADD COLUMN title varchar(255) NULL, ADD COLUMN image longtext, ADD COLUMN cta varchar(255) NULL, ADD COLUMN os varchar(255) NULL" \
D=my_database,t=users,h=localhost \
--user root \
--ask-pass \
--dry-run
2
3
4
5
6
To really run the command replace --dry-run by --execute 😉
Further examples
pt-online-schema-change \
--alter "ADD COLUMN c2 VARCHAR(45) NULL AFTER c1, ADD COLUMN c3 VARCHAR(8) AFTER c2" \
D=DB,t=table,h=localhost \
--user root \
--ask-pass \
--dry-run
2
3
4
5
6
pt-online-schema-change \
--alter "ADD UNIQUE unique_name(c1, c2)" \
D=DB,t=table,h=localhost \
--user root \
--ask-pass \
--dry-run
2
3
4
5
6
Percona sourceopen in new window
MySQL alter table docopen in new window
# Percona XtraDB Cluster
# Features of Percona XtraDB Cluster
(open source, cost-effective, and robust MySQL clustering)
| Feature | Details |
|---|---|
| Synchronous replication** | Data is written to all nodes simultaneously, or not written at all in case of a failure even on a single node |
| Multi-master replication | Any node can trigger a data update. |
| True parallel replication | Multiple threads on slave performing replication on row level |
| Automatic node provisioning | You simply add a node and it automatically syncs. |
| Data consistency | No more unsynchronized nodes. |
| PXC Strict Mode | Avoids the use of experimental and unsupported features |
| Configuration script for ProxySQL | Percona XtraDB Cluster includes the proxysql-admin tool that automatically configures Percona XtraDB Cluster nodes using ProxySQL. |
| Automatic configuration of SSL encryption | Percona XtraDB Cluster includes the pxc-encrypt-cluster-traffic variable that enables automatic configuration of SSL encryption |
| Optimized Performance | Percona XtraDB Cluster performance is optimized to scale with a growing production workload |
Big gain in scaling
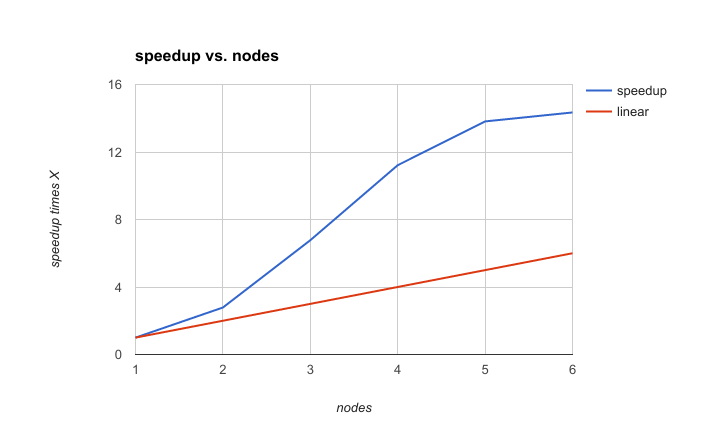
Source :
An excellent bench by the CTO of Perconaopen in new window
# Preparing your user
CREATE USER 'sstuser'@'localhost' IDENTIFIED BY '*********';
GRANT RELOAD, LOCK TABLES, PROCESS, REPLICATION CLIENT ON *.* TO 'sstuser'@'localhost';
FLUSH PRIVILEGES;

CREATE USER 'clustercheckuser'@'%' IDENTIFIED BY '*********';
GRANT PROCESS, SUPER ON *.* TO 'clustercheckuser'@'%';
FLUSH PRIVILEGES;
2
3
4
5
6
7
# Preparing your firewall
By default, Percona XtraDB Cluster nodes use the following ports:
3306is used for MySQL client connections and SSTopen in new window (State Snapshot Transfer) via mysqldump.4444is used for SST via rsync and Percona XtraBackupopen in new window.4567is used for write-set replication traffic (over TCP) and multicast replication (over TCP and UDP).4568is used for ISTopen in new window (Incremental State Transfer).
# Install repo + package
apt-get remove apparmor
wget https://repo.percona.com/apt/percona-release_latest.generic_all.deb
dpkg -i percona-release_latest.generic_all.deb
2
3
Enable repository for your desired version
- 57 = 5.7
- 80 = 8.0
percona-release setup pxc57
percona-release setup pxc80
2
apt update
apt-cache search percona
2
Installing percona-xtradb-cluster-server-5.7
apt-get install percona-xtradb-cluster-57
# enter the Database root password
#verify that no error occurs
#verify dpkg
dpkg -l | grep -i percona
2
3
4
5
Stop Percona XtraDB Cluster server. To thune it !
service mysql stop
# Tunning
Move working directory from /var/lib/mysql to /data/mysql
mkdir /data/mysql
mkdir /data/log_mysql
# cp -r /var/lib/mysql/* /data/mysql/
#you have to create this file manually, otherwise you'll get an error, percona is not able to do this itself...
touch /data/log_mysql/mysqld.log
chown -R mysql: /data/mysql/ /data/log_mysql/
2
3
4
5
6
Optional part in case of errors
touch /var/run/mysqld/mysqld.pid;
touch /var/run/mysqld/mysqld.lock;
touch /var/run/mysqld/mysqld.sock;
chown -R mysql:mysql /var/run/mysqld/;
2
3
4
Full list hereopen in new window
# Seting up the cluster
vim /etc/mysql/my.cnf
!includedir /etc/mysql/conf.d/
!includedir /etc/mysql/percona-xtradb-cluster.conf.d/
[mysqld]

wsrep_provider=/usr/lib/libgalera_smm.so

# cluster visible name
wsrep_cluster_name=my-pxc-cluster
# other nodes IPs
wsrep_cluster_address=gcomm://10.10.10.10,10.10.10.11,10.10.10.12

# this node name + IP
wsrep_node_name=my_hostname
wsrep_node_address=10.10.10.10

wsrep_sst_method=xtrabackup-v2
# credentials you set up at the begining
# $user:$password
wsrep_sst_auth=sstuser:my_password

pxc_strict_mode=ENFORCING

binlog_format=ROW
default_storage_engine=InnoDB
innodb_autoinc_lock_mode=2
2
3
4
5
6
7
8
9
10
11
12
13
14
15
16
17
18
19
20
21
22
23
24
25
vim /etc/mysql/percona-xtradb-cluster.conf.d/mysqld.cnf
# Template my.cnf for PXC
# Edit to your requirements.
[mysqld]
user                =mysql
# node number in the cluster, only you can know this value...
server-id           =3
basedir             =/usr
datadir             =/data/mysql
pid-file            =/var/run/mysqld/mysqld.pid
socket              =/var/run/mysqld/mysqld.sock

log-error           =/data/log_mysql/mysqld.log
log_bin             =/data/log_mysql/mysql-bin.log

expire_logs_days    =7

lc-messages-dir     =/usr/share/mysql
explicit_defaults_for_timestamp
max_connections     = 20000
skip-external-locking
skip-name-resolve
max_allowed_packet  = 16M
thread_stack        = 192K
thread_cache_size   = 8
query_cache_limit   = 1M
query_cache_size    = 16M
auto_increment_increment = 3
auto_increment_offset = 1

innodb_buffer_pool_size = 2G
innodb_log_file_size = 1G

sql_mode=IGNORE_SPACE,NO_ZERO_IN_DATE,NO_ZERO_DATE,ERROR_FOR_DIVISION_BY_ZERO,NO_AUTO_CREATE_USER,NO_ENGINE_SUBSTITUTION

# haproxy incoming adresse for header expecting
proxy_protocol_networks="10.10.10.21,10.10.10.22"

# Disabling symbolic-links is recommended to prevent assorted security risks
symbolic-links=0
2
3
4
5
6
7
8
9
10
11
12
13
14
15
16
17
18
19
20
21
22
23
24
25
26
27
28
29
30
31
32
33
34
35
36
37
38
39
proxy_protocol_networks is configuration like "who is sending me X-Forwarded-For HTTP header ?" but for MySQL protocol
To get transparent Proxy which forward SOURCE IP from REAL client
On all node add the proxy IP (to enable Percona read added HEADER)
# Bootstrapping the First Node
Initialize the cluster by bootstrapping the first node. The initial node should be the one that contains all your data, it's the starting point of the cluster notion which you want to be replicated to other nodes.
Implies starting the node without any known cluster addresses. If the wsrep_cluster_address variable is empty, Percona XtraDB Cluster assumes that this is the first node and initializes the cluster. Instead of changing the configuration, start the first node using the following command:
- On the first node
tmux
/etc/init.d/mysql bootstrap-pxc
or
/usr/bin/mysqld_safe --wsrep-new-cluster
2
3
4
- Create the
sstuseron this node, in order for the other nodes to sync with this first one.
CREATE USER 'sstuser'@'localhost' IDENTIFIED BY '*********';
GRANT RELOAD, LOCK TABLES, PROCESS, REPLICATION CLIENT ON *.* TO 'sstuser'@'localhost';
FLUSH PRIVILEGES;
2
3
- Then , on all other nodes (IT CAN TAKES 2 MINUTES) On each node
systemctl start mysql
- On the first node, send
SIGQUIT(pressCTRL + \on the console) and (re)start with systemd
CTRL + \
# wait for approximately 10 secondes
systemctl start mysql
2
3
- Ensure the cluster size is 3 (total of your nodes number)
To make sure that the cluster has been initialized, run the following:
show status like 'wsrep%';
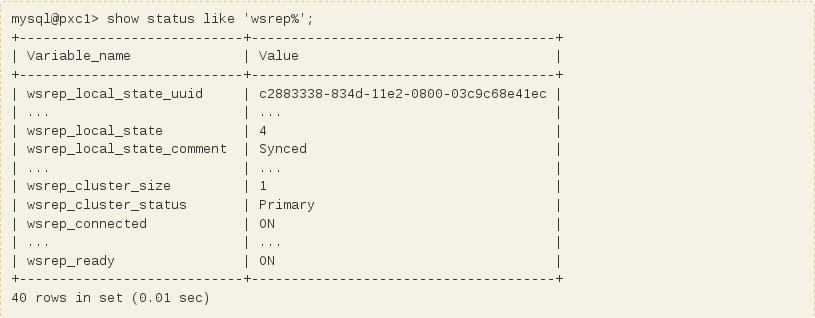
The previous output shows that the cluster size is 1 node, it is the primary component, the node is in Synced state, it is fully connected and ready for write-set replication
# Verify replication
Create a new database on the second node:
CREATE DATABASE percona;
Create a table on the third node:
USE percona;
CREATE TABLE example (node_id INT PRIMARY KEY, node_name VARCHAR(30));
2
Insert records on the first node:
USE percona;
INSERT INTO percona.example VALUES (1, 'percona1');
2
Retrieve rows from that table on the second node:
SELECT * FROM percona.example;
+---------+-----------+
| node_id | node_name |
+---------+-----------+
|       1 | percona1  |
+---------+-----------+
1 row in set (0.00 sec)
2
3
4
5
6
7
### HAProxy integration Now the cluster is 100% functional, we will set up a haproxy to load balance workload between nodes.
Preparing dedicated user for local health check
As we only need to perform mysql aliveness with command like
SHOW GLOBAL STATUS LIKE 'wsrep_%';
SHOW GLOBAL VARIABLES LIKE 'read_only';
2
We don't need to be root with all privileges on the DB.
That's why we will create a dedicated user with minimal permissions (PROCESS) On, one of the cluster's node :
CREATE USER 'clustercheckuser'@'%' IDENTIFIED BY '*********';
GRANT PROCESS, SUPER ON *.* TO 'clustercheckuser'@'%';
FLUSH PRIVILEGES;
2
3
test connectivity (from your laptop or from the haproxy)
mysql -h any_node_IP -u clustercheckuser -p -e "show status like 'wsrep%'"
# Configure HAProxy
[...]
bind 10.10.10.1:3306
    option httpchk

    server NODE01 10.10.10.10:3306 check port 9200 rise 1 fall 3 send-proxy
    server NODE02 10.10.10.11:3306 check port 9200 rise 1 fall 3 send-proxy
    server NODE03 10.10.10.12:3306 check port 9200 rise 1 fall 3 send-proxy
[...]
2
3
4
5
6
7
8
# Check load balancing
Test replication from reverse proxy
for i in `seq 1 6`
do
mysql -h 10.10.10.1 -u clustercheckuser -p -e "show variables like 'server_id'"
done

+---------------+-------+
| Variable_name | Value |
+---------------+-------+
| server_id     | 1     |
+---------------+-------+
+---------------+-------+
| Variable_name | Value |
+---------------+-------+
| server_id     | 2     |
+---------------+-------+
+---------------+-------+
| Variable_name | Value |
+---------------+-------+
| server_id     | 3     |
+---------------+-------+
+---------------+-------+
| Variable_name | Value |
+---------------+-------+
| server_id     | 1     |
+---------------+-------+
+---------------+-------+
| Variable_name | Value |
+---------------+-------+
| server_id     | 2     |
+---------------+-------+
+---------------+-------+
| Variable_name | Value |
+---------------+-------+
| server_id     | 3     |
+---------------+-------+
2
3
4
5
6
7
8
9
10
11
12
13
14
15
16
17
18
19
20
21
22
23
24
25
26
27
28
29
30
31
32
33
34
35
# Xinetd Local health check
To be used by HATCP, to check the real aliveness of the MySQL Cluster. Xinetd listens on port 9200 and each time a request is received, it runs locally /usr/bin/clustercheck and send the content (HTTP) on TCP payload.Credentials depend on which cluster you're deploying xinetd.
vim /usr/bin/clustercheck
Test script, you should get a HTTP 200 response
/usr/bin/clustercheck

HTTP/1.1 200 OK
Content-Type: text/plain
Connection: close
Content-Length: 40

Percona XtraDB Cluster Node is synced.
2
3
4
5
6
7
8
# Percona - Troubleshooting
# Bootstraping issues
After crash, powerfailure, or if you want to restart from scratch your cluster installation.
You need to edit the grastate.dat file manually and set safe_to_bootstrap to 1
vim /var/lib/mysql/grastate.dat
and then start a new cluster
init.d style or systemd style
/etc/init.d/mysql bootstrap-pxc
/usr/bin/mysqld_safe --wsrep-new-cluster
2
3
# No space left
If disk if full on one node, for example after benchmark, stop the faulty node. Delete ALL the database directory (not just data file). And restart to be synchronized with the cluster.
systemctl stop mysql

rm -rf /var/lib/mysql/*
2
3
# Unix socket issue
[ERROR] Could not create unix socket lock file /var/run/mysqld/mysqld.sock.lock.
[ERROR] Unable to setup unix socket lock file.
[ERROR] Aborting
2
3
If you get this error from mysqld.log or if the SST (snapshot state transfer) enters in an infinite loop
chown -R mysql: /var/run/mysqld/
# Got packets out of order
If you get ERROR 1156 (08S01): Got packets out of order, you've got a proxy problem.
In many cases, the haproxy add header with the directive send-proxy and your backend nodes are not able to read them because they don't know the ip of the load balancers.
You can check if nodes have proxy set :
show variables like '%proxy_protocol_networks%';

+-------------------------+---------------------------------------+
| Variable_name           | Value                                 |
+-------------------------+---------------------------------------+
| proxy_protocol_networks | 10.10.10.10,10.10.10.11               |
+-------------------------+---------------------------------------+
2
3
4
5
6
7
If you don't have this set, so empty : you have to set proxy_protocol_networks variable in one of the mysql config
/etc/mysql/my.cnf or in /etc/mysql/percona-xtradb-cluster.conf.d/mysqld.cnf or in another file included by includedir or include directive
last time the error was a missing
!includedir /etc/mysql/conf.d/
!includedir /etc/mysql/percona-xtradb-cluster.conf.d/
2
# PID issues
Bootstrapping Percona XtraDB Cluster database server: mysqldStale PID file found: /var/run/mysqld/mysqld.pid with 31219 ... (warning).
Please take a look at the syslog. ... failed!
failed!
2
3
or
Bootstrapping Percona XtraDB Cluster database server: mysqld
 . . . . . . . . . . .The server quit without updating PID file (/var/run/mysqld/mysqld.pid). ... failed!
failed!
2
3
- For the first, during a bootstrap, if you customize the
datadirdirective, it may block server from starting. So let's begin with/var/lib/mysqlfor this first step. And after the cluster is working, stop, change datadir, and restart.
/data/mysql
/var/lib/mysql
2
- You probably
alreadyhave a mysql running, to see that.
kill the process and restart
ps -ef | grep mysql

kill -9 $(pgrep mysqld)
2
3
- The
sstusercould have been badly set up. So redo properly.
CREATE USER 'sstuser'@'localhost' IDENTIFIED BY '*********';
GRANT RELOAD, LOCK TABLES, PROCESS, REPLICATION CLIENT ON *.* TO 'sstuser'@'localhost';
FLUSH PRIVILEGES;
2
3
# Service not running but server run well
If your cluster works well (when >
show status like 'wsrep%';
tells you it's alright but when systemctl status mysql doesn't say ● mysql.service active (running).
In this case you have to :
rm /var/run/*
kill -9 $(pgrep mysqld)
2
MySQL probably lack of ownership on all his datadir. Most often mysqld_safe.pid is own by root. You have to give back ownership to mysql user.
chown -R mysql: /var/lib/mysql
# Percona Monitoring and Management
Docopen in new window
Live demoopen in new window
# PhpMyAdmin (pma)
# Global config
/etc/phpmyadmin/config-db.php
<?php
$dbuser='phpmyadmin';
$dbpass='$PASSWORD';
$basepath='';
$dbname='phpmyadmin';
$dbserver='$IP';
$dbport='3306';
$dbtype='mysql';
2
3
4
5
6
7
8
# Hosts
Proper way is to locate vhost like nginx here./etc/phpmyadmin/conf.d/*
<?php // let the interpreter know this is code
$cfg['Servers'][1]['verbose'] = 'Cluster one';
$cfg['Servers'][1]['host'] = '$IP';
$cfg['Servers'][1]['port'] = '3306';
$cfg['Servers'][1]['socket'] = '';
$cfg['Servers'][1]['connect_type'] = 'tcp';
$cfg['Servers'][1]['extension'] = 'mysqli';
$cfg['Servers'][1]['auth_type'] = 'cookie';
$cfg['Servers'][1]['AllowNoPassword'] = false;
2
3
4
5
6
7
8
9
<?php // let the interpreter know this is code
$cfg['Servers'][2]['verbose'] = 'Cluster two';
$cfg['Servers'][2]['host'] = '$IP';
$cfg['Servers'][2]['port'] = '3306';
$cfg['Servers'][2]['socket'] = '';
$cfg['Servers'][2]['connect_type'] = 'tcp';
$cfg['Servers'][2]['extension'] = 'mysqli';
$cfg['Servers'][2]['auth_type'] = 'cookie';
$cfg['Servers'][2]['AllowNoPassword'] = false;
2
3
4
5
6
7
8
9
# ProxySQL
Setup ProxySQL for High Availability (not a Single Point of Failure)open in new window
# Redis
# Protocole
RESP (REdis Serialization Protocol) https://redis.io/topics/protocol
# Master Slave
Get info about master/slave replication
redis-cli -h 10.10.10.10 -p 6379 -a $PASSWORD info replication
FLUSH all keys of all databases
redis-cli FLUSHALL
Delete all keys of the specified Redis database
redis-cli -n <database_number> FLUSHDB
# Redis cluster
remove keys from file as input
redis --help
-c                 Enable cluster mode (follow -ASK and -MOVED redirections).
for line in $(cat lines.txt); do redis-cli -a xxxxxxxxx -p 7000 -c del $line; done
2
3
Check all databases
CONFIG GET databases
1) "databases"
2) "16"
2
3
INFO keyspace

db0:keys=10,expires=0
db1:keys=1,expires=0
db3:keys=1,expires=0
2
3
4
5
Delete multiples keys
redis-cli -a XXXXXXXXX --raw keys "my_word*" | xargs redis-cli -a XXXXXXXXX del
Resolve warning
cat /etc/systemd/system/disable-transparent-huge-pages.service
[Unit]
Description=Disable Transparent Huge Pages

[Service]
Type=oneshot
ExecStart=/bin/sh -c "/bin/echo "never" | tee /sys/kernel/mm/transparent_hugepage/enabled"

[Install]
WantedBy=multi-user.target
2
3
4
5
6
7
8
9
10
# InfluxDB
get prompt
influx
# Retention policy
SHOW databases;
USE lands

SHOW RETENTION POLICIES ON "lands"
2
3
4
# MySQL equivalent
| MySQL | Influx |
|---|---|
| DATABASE | DATABASE |
| MEASUREMENT | TABLE |
| COLUMN | FIELD && TAG |
SHOW series ON database FROM virtualmachine WHERE cluster = 'PROD'
# InfluxDB paradygm
Each record stored inside of a measurement is known as a point . Points are made up of the following:
- pretime : Timestamp that represents the time in which the data was recorded.
- field : Contain the actual measurement data, e.g 5% CPU utilisation. Each point must contain one or more fields .
- tags : Metadata about the data being recorded, e.g the hostname of the device whose CPU is being monitored. Each point can contain zero or more tags .
(Note that both the fields and tags can be thought of as columns in the database table. We’ll see why in a moment.)
-- default on all measurement
SHOW field keys

-- default on all measurement
SHOW tag keys

SELECT usage_user,cpu,host
FROM cpu
WHERE cpu='cpu-total'
AND host='ubuntu'
AND time > now() - 30s
2
3
4
5
6
7
8
9
10
11