# Docker
# Introduction to container
# What even is a container: namespaces and cgroups !?
The first time I heard about containers it was like – what? what’s that?
Is a container a process? What’s Docker? Are containers Docker? Help!
The word “container” doesn’t mean anything super precise. Basically there are a few new Linux kernel features (“namespaces” and “cgroups”) that let you isolate processes from each other. When you use those features, you call it “containers”.
Basically these features let you pretend you have something like a virtual machine, except it’s not a virtual machine at all, it’s just processes running in the same Linux kernel. Let’s dive in!
# namespaces
Okay, so let’s say we wanted to have something like a virtual machine. One feature you might want is – my processes should be separated from the other processes on the computer, right?
One feature Linux provides here is namespaces. There are a bunch of different kinds:
- in a
Pid namespaceyou become PID 1 and then your children are other processes. All the other programs are gone - in a
Networking namespaceyou can run programs on any port you want without it conflicting with what’s already running - in a
Mount namespaceyou can mount and unmount filesystems without it affecting the host filesystem. So you can have a totally different set of devices mounted (usually less)
Let’s make a new PID namespace and run bash in it!
sudo \
unshare \
--fork \
--pid \
--mount-proc \
bash
2
3
4
5
6
--fork: Fork the specified program as a child process of unshare rather than running it directly. This is useful when creating a new PID namespace.--mount-proc[=mountpoint]: Just before running the program, mount the proc filesystem at mountpoint (default is /proc). This is useful when creating a new PID namespace. It also implies creating a new mount namespace since the /proc mount would otherwise mess up existing programs on the system. The new proc filesystem is explicitly mounted as private (with MS_PRI‐VATE|MS_REC).--pid[=file]: Unshare the PID namespace. If file is specified then persistent namespace is created by a bind mount. See also the --fork and --mount-proc options.
By running this command you have just created two namespaces :
pid namespacemount namespace
# Cgroups: resource limits
Cgroups (abbreviated from control groups) is a Linux kernel feature that limits, accounts for, and isolates the resource usage (CPU, memory, disk I/O, network, etc.) of a collection of processes.
# Presentation
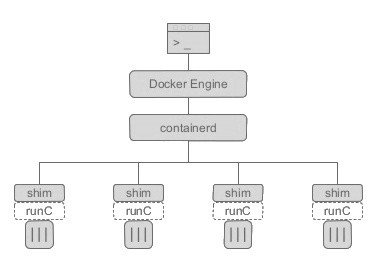
Docker CLI -> Docker Engine -> containerd -> containerd-shim -> runC (or other runtime)
Note that dockerd (docker daemon) has no child. The master process of all containers is containerd.
There is only one containerd-shim by process and it manages the STDIO FIFO and keeps it open for the container in case containerd or Docker dies.
runC is built on libcontainer which is the same container library powering a Docker engine installation. Prior to the version 1.11, Docker engine was used to manage volumes, networks, containers, images etc.. Now, the Docker architecture is broken into four components: Docker engine, containerd, containerd-shm and runC. The binaries are respectively called docker, docker-containerd, docker-containerd-shim, and docker-runc.
To run a container, Docker engine creates the image, pass it to containerd. containerd calls containerd-shim that uses runC to run the container.
Then, containerd-shim allows the runtime (runC in this case) to exit after it starts the container : This way we can run daemon-less containers because we are not having to have the long running runtime processes for containers.
 [Sources](https://medium.com/faun/docker-containerd-standalone-runtimes-heres-what-you-should-know-b834ef155426)
 # Find all the containerized process on the system
Get pid of containerd
pidof containerd
921
2
Get child of containerd (i.e. pid of containerd-shim) i.e. search for process who has for parent process containerd ( hence --ppid )
ps -o pid --no-headers --ppid $(pidof containerd)
19485
2
Get child of containerd-shim (i.e. the real final containerized process)
ps -o pid --no-headers --ppid $(ps -o pid --no-headers --ppid $(pidof containerd))
19502
2
Get the name of the output process
ps -p $(ps -o pid --no-headers --ppid $(ps -o pid --no-headers --ppid $(pidof containerd))) -o comm=
bash
2
# Docker run
docker run -d \
--name elasticsearch \
--net somenetwork \
--volume my_app:/usr/share/elasticsearch/data \
-p 9200:9200 -p 9300:9300 \
-e "discovery.type=single-node" \
elasticsearch:7.4.1
2
3
4
5
6
7
# Docker exec
Exec a bash into a container (attach)
-q: only prompt container id-f: filter-a: all
docker exec -it $(docker ps -aqf "name=api-streaming") bash
# Docker volume
docker volume create my_app
# Docker network
# Troubleshoot
could not find an available, non-overlapping IPv4 address pool among the defaults to assign to the network
Change docker subnet 😃
Example 172.33.0.0/16
vim /etc/docker/daemon.json
{
        "default-address-pools": [
                {
                        "base": "172.33.0.0/16",
                        "size": 24
                }
        ]
}
2
3
4
5
6
7
8
systemctl restart docker
https://support.getjoan.com/hc/en-us/articles/360008889859-How-to-change-the-Docker-default-subnet-IP-address
# Docker ps
avoid false positives
^ : begin with
$ : end with
docker ps -aqf "name=^containernamequot;
# Select format
Print only running command
docker ps --format "{{.Command}}" --no-trunc
# Get resources usage
docker stats --format "table {{.Name}}\t{{.CPUPerc}}\t{{.MemUsage}}"
docker stats --format "table {{.Name}}\t{{.CPUPerc}}\t{{.MemUsage}}" --no-stream
2
# Docker inspect
Info abou the filesystem
docker inspect -f '{{ json .Mounts }}' $(docker ps -aqf "name=elasticsearch") | jq
# Docker build
It can be weird but when you just want to build a container image, docker wants to store it in a registry (unless you specify on output file), that's why the command will implicitly push locally. You can check this by yourself with docker image ls.
docker build -t `REPOSITORY`:`tag` .
docker build -t baptistedauphin/gitbook:3.2.3 .
2
docker image ls
REPOSITORY                TAG                 IMAGE ID            CREATED             SIZE
baptistedauphin/gitbook   3.2.3               0b86563e2212        13 seconds ago      267MB
2
3
# Docker push
Before push on a real registry (like DockerHubopen in new window) you have to be loged-in. The default registry you try to login is docker.io
docker info | grep -i registry
 Registry: https://index.docker.io/v1/
2
Build & push one line
docker build -t baptistedauphin/gitbook:3.2.3 . && docker push baptistedauphin/gitbook:3.2.3
docker login --username baptiste registry.example.com
docker login
Authenticating with existing credentials...
WARNING! Your password will be stored unencrypted in /home/baptiste/.docker/config.json.
Configure a credential helper to remove this warning. See
https://docs.docker.com/engine/reference/commandline/login/#credentials-store

Login Succeeded
2
3
4
5
6
7
And then, you can push to your repository
docker push baptistedauphin/gitbook:3.2.3
# Registry
A registry is an instance of the registry image, and runs within Docker.
# Run a local registry
Use a command like the following to start the registry container
docker run -d -p 5000:5000 --restart=always --name registry registry:2
The registry is now ready to use.
Warning: These first few examples show registry configurations that are only appropriate for testing. A production-ready registry must be protected by TLS and should ideally use an access-control mechanism. Keep reading and then continue to the configuration guideopen in new window to deploy a production-ready registry.
# Run an externally-accessible registry
Running a registry only accessible on localhost has limited usefulness. In order to make your registry accessible to external hosts, you must first secure it using TLS.
These examples assume the following:
- Your registry URL is https://myregistry.domain.com/.
- Your DNS, routing, and firewall settings allow access to the registry’s host on port 443.
- You have already obtained a certificate from a certificate authority (CA).
- Create a certs directory.
mkdir -p certs
Copy the .crt and .key files from the CA into the certs directory. The following steps assume that the files are named domain.crt and domain.key.
- Stop the registry if it is currently running.
docker container stop registry
- Restart the registry, directing it to use the TLS certificate. This command bind-mounts the
certs/directory into the container at/certs/, and sets environment variables that tell the container where to find thedomain.crtanddomain.keyfile. The registry runs on port 443, the default HTTPS port.
docker run -d \
  --restart=always \
  --name registry \
  -v "$(pwd)"/certs:/certs \
  -e REGISTRY_HTTP_ADDR=0.0.0.0:443 \
  -e REGISTRY_HTTP_TLS_CERTIFICATE=/certs/domain.crt \
  -e REGISTRY_HTTP_TLS_KEY=/certs/domain.key \
  -p 443:443 \
  registry:2
2
3
4
5
6
7
8
9
See source 😃open in new window
# Configuring a registry
https://docs.docker.com/registry/configuration/
# Tips
# Restart a container
docker container restart debian8
# Detach from a container without stopping it
ctrl + p, ctrl + q.
And then, you can later attach back to it !
docker exec -it $(docker ps -aqf "name=debian8") bash
# Run a single command
(no interactive) No need to tell -it
docker run \
--rm \
-e VAULT_TOKEN=mytoken \
-e VAULT_ADDR=https://vault.url.tld \
vault:1.3.3 \
kv get -field=myfield path/to/secret
2
3
4
5
6
# Read stdin
gitlab GET /groups/987/variables/DOCKER_TLS_CERT \
| jq -r .value | \
docker run \
--rm \
-i \
--entrypoint=sh \
frapsoft/openssl \
-c 'openssl x509 -in /dev/stdin -noout -dates 2>/dev/null'
2
3
4
5
6
7
8
# Execute container in the current directory
!!! Warnings !!! You can actually REMOVE permanently files stored in your rootfile system from inside the container (due to mounted volume)
docker run -ti -v $(pwd):/tmp DOCKER_IMAGE:TAG /bin/bash
# Override the ENTRYPOINT
docker run --rm -it --entrypoint "/bin/bash" baptistedauphin/hugo:0.67.0

docker run --rm -it baptistedauphin/hugo:0.67.0
2
3
# Connect from network
docker \
-H tcp://example.org:2376 \
--tlsverify \
--tlscacert=ca.pem \
--tlscert=cert.pem \
--tlskey=key.pem \
service ls
2
3
4
5
6
7